So typically, as a beginner, you would drop down a basic plane, and you would drag a texture over it that you might have sourced somewhere, and it kind of looks alright, but your ground looks like it’s a magazine cover. What gives?
Solution modify the shader created by the texture (usually uses the default shader)
Shaders are several blog articles worth of knowledge but you can get started with the basics easily
Beginner cautions
So typically, Unity will have a default shader that will coat all your objects with the same material by default. So if you put down a floor plane and you made that green. If you were to spawn a cube, that cube would use the default shader, so your cube would also look green.
So consider shaders like “global objects,” meaning that if you have multiple materials using one shader and update that shader on one object, it will still change the shader for all of those objects using that shader.
How do we create new material shaders?
This is a hacky way of doing it but it works. Go find a shader in your project folder and right-click inside the folder hierarchy to browse to the location of where your project is stored.

From there, you could duplicate an existing material, rename it and then change the shader inside Unity. When you go back into Unity, your new material will be imported automatically. If not, it should appear in the folder structure, and you can apply it to where you want it manually with a click and drag move.
The better way to dupe and create new shaders
You can click on the option settings inside a shader and create a material preset, which will create a preset based on the current shader configuration. If you do the previous step combined with this step, you could create the shaders in bulk this way which will stop you from going back and forth. You can always edit them later, and I think it’s important to set your project up for success by working with basic shaders and various them from the project start. The benefit is you are rough prototyping your build while you are building it.
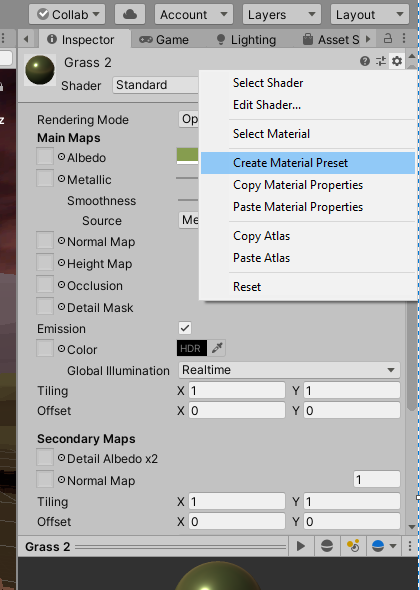
- You can also copy presets to another material if you want to copy a likeness of another material to another. This is useful if you are using baked lighting with your scene and you want to stay in a similar color palette to suit, which makes it a lot easier to get lighting more perfect.
Changing materials to be less reflective & glossy
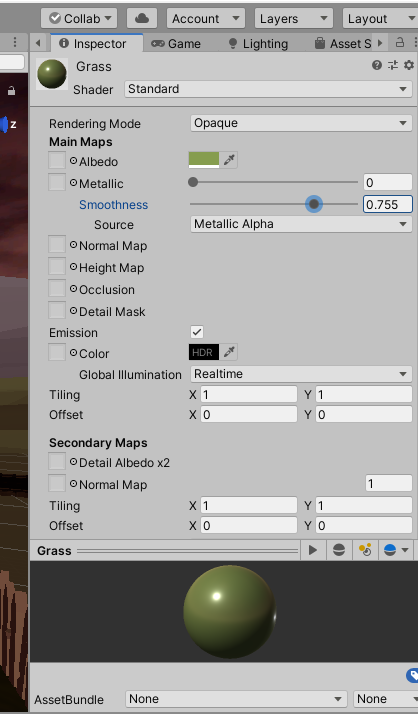
So this grass shader as you can see by the icon next to the shader’s name that it’s reflecting light.
Solution:
- Change your smoothness down to 0 and boost your Metalic rate.
This most times will resolve the glossy look but also take this advice with a grain of salt because no two projects are alike and your world may require some smoothness. There is no right or wrong way, just go with what looks like the end result you want.
Full Instructions
Step 1: Setting up the Project
Before you start creating textures, you need to set up a new project in Unity. To do this, follow these steps:
- Open Unity Hub.
- Click on the “New” button to create a new project.
- Choose the “3D” template.
- Give your project a name and select a location to save it.
- Click on the “Create” button.
Step 2: Importing Textures
Once you’ve set up your project, you need to import textures into Unity. To do this, follow these steps:
- Right-click in the Assets panel and select “Import Package > Custom Package.”
- Locate the texture you want to import and select it.
- Click on the “Import” button.
Step 3: Creating a Material
The next step is to create a material in Unity. To do this, follow these steps:
- Right-click in the Assets panel and select “Create > Material.”
- Give your material a name.
- Drag and drop the texture you imported into the “Albedo” field.
- Click on the “Apply” button to save your changes.
Step 4: Adjusting the Shader Settings
Now that you have a material, you can adjust the shader settings to make the texture look less glossy. To do this, follow these steps:
- Select the material you just created.
- In the Inspector panel, click on the “Shader” dropdown and select “Standard.”
- In the “Smoothness” field, adjust the value to 0.
Recommended Settings for Making Textures Look Less Glossy
When making textures look less glossy in Unity, the following settings are recommended:
| Property | Value |
|---|---|
| Shader | Standard |
| Smoothness | 0 |
By following these recommended settings, you can make your textures look less glossy in Unity.