Install and Configure Unity Hub for VRChat
Unity Hub manages Unity Editor installations, platform modules, licenses, and project-to-Editor associations. For VRChat creation, use Hub to install and license Unity, then use VRChat Creator Companion to create and manage world or avatar projects.
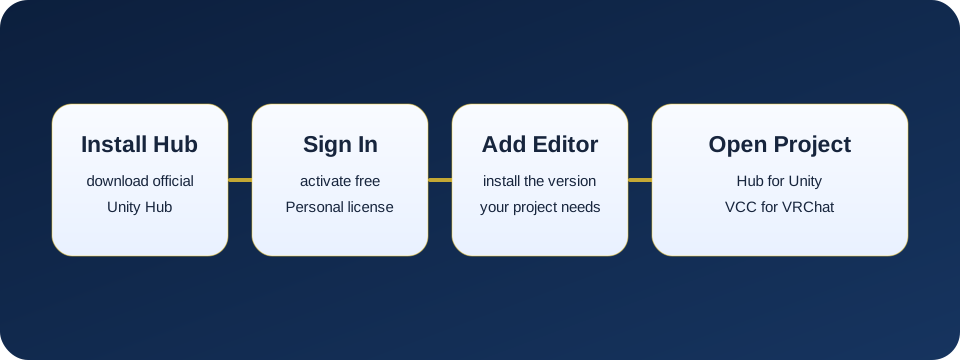
Install the stable Hub, activate a license, and install the exact Editor version supported by VRChat.
- Download and install Unity Hub from Unity’s official site.
- Sign in and confirm a Unity license is active.
- Install VRChat’s supported Editor and required platform modules.
VRChat currently lists Unity 2022.3.22f1 as its supported Editor. Use VRChat’s Current Unity Version page or Creator Companion to begin that installation; do not substitute the newest Editor shown in Hub.
Understand the Applications
| Application | Responsibility |
|---|---|
| Unity Hub | Unity account sign-in, licenses, Editor installations, platform modules, and project-to-Editor associations |
| Unity Editor | Scenes, assets, materials, avatars, worlds, scripts, builds, and testing |
| VRChat Creator Companion | VRChat project templates, SDK packages, VPM packages, project management, and supported-Editor guidance |
Installing Hub does not install every Unity Editor automatically. Installing an Editor does not create a VRChat project. Complete each layer deliberately.
Check Windows Requirements
Unity’s current Hub documentation supports:
- Windows 10 version 21H1 or later, 64-bit
- Windows 11
VRChat’s Getting Started documentation tells new creators to use Windows for their first project.
Before installation, confirm:
- Windows is supported and updated
- the system drive and Editor-install drive have enough free space
- a Unity account is available
- a VRChat account is available
- the user account can install applications
Editor installations and platform modules require substantially more space than the Hub application alone.
Install Unity Hub
- Open Unity’s Download Unity page.
- Sign in to a Unity account or create one.
- Download Unity Hub for Windows.
- Open the downloaded
.exe. - Follow the Unity Hub setup prompts.
- Launch Hub.
- Sign in with the Unity ID.
Unity documents that Hub can request file-system or firewall access on first launch. It uses those permissions to find local projects and Editors and to retrieve online resources.
Use the current stable Hub unless Unity or VRChat documents a specific compatibility requirement. A legacy Unity Editor does not require a legacy Hub; archived Editor versions have their own installation route.
Activate a Unity License
Unity Hub uses the Licenses section for license management.
For Unity Personal:
- Open Hub and sign in.
- Select Licenses in the left sidebar.
- Confirm an active Unity Personal license appears.
Unity documents that signing in normally activates Unity Personal automatically. If it does not:
- Select Licenses > Add license.
- Select Get a free personal license.
- Read the terms.
- Select Agree and get personal edition license.
Use Unity Personal only when its current eligibility terms apply to you. Paid, education, named-user, serial, and offline licensing use different procedures documented by Unity.
Do not reinstall the Editor to solve a license warning. Resolve the license in Hub first.
Install VRChat’s Supported Unity Editor
Do not select an Editor from Hub’s newest-release list by guesswork.
- Open VRChat’s Current Unity Version page.
- Confirm the exact supported version.
- Use the Creator Companion installation flow or the Unity Hub link supplied by VRChat.
- Allow the browser to open Unity Hub when prompted.
- Confirm the requested Editor version before installation.
- Select the required modules.
- Start the installation.
- Monitor progress in Hub’s Downloads area.
VRChat currently identifies Unity 2022.3.22f1. Recheck the official page when installing because this value can change.
Unity Hub’s Archive route can install older Editor versions that are not listed under current official releases. Use the archive only when an official project requirement names that version.
Select Platform Modules
Modules add build support and developer tools to a specific Editor installation.
| Target | Module |
|---|---|
| VRChat Android, Quest, or Android mobile | Android Build Support, including its required tools |
| VRChat iOS | iOS Build Support |
| PC-only initial setup | No Android or iOS module is required until those targets are needed |
VRChat’s Current Unity Version page asks creators targeting iOS, Android, or Quest to select the corresponding build-support modules during Editor installation.
Only install modules required by the project. They can be added later.
Add Modules After Installation
Unity documents this Hub path:
- Open Unity Hub.
- Select Installs.
- Find the exact Editor version.
- Select Manage.
- Select Add modules.
- Choose the required modules.
- Select Install.
The Add modules option is available for Editors installed through Hub. Unity states that manually installed Editors generally need to be reinstalled through Hub before modules can be added this way.
Always confirm the Editor version before adding modules. A module installed for another Unity version will not satisfy the project’s requirement.
Verify the Editor Installation
In Hub:
- Select Installs.
- Confirm the exact supported Editor version is listed.
- Open Manage and confirm the required modules.
- Use the installation-location option if the path needs verification.
Then open Creator Companion:
- Open Settings.
- Find the Unity Editor configuration.
- Refresh the detected Editors.
- Select or locate the supported Editor when required.
Do not create the VRChat project until Creator Companion can identify the supported Editor.
Locate an Existing Editor
If the Editor already exists but is absent from Hub:
- Open Hub > Installs.
- Select Locate.
- Browse to the installation containing the Unity Editor executable.
- Select the correct Editor installation.
Locating an Editor adds it to Hub’s list; it does not convert a manual installation into a Hub-managed installation. Module management can therefore remain unavailable for a manually installed Editor.
Create the VRChat Project in Creator Companion
Once Hub, licensing, the supported Editor, and modules are ready:
- Open VRChat Creator Companion.
- Select Create New Project.
- Choose World or Avatar.
- Set the project name and location.
- Create and open the project.
Do not create a VRChat project from a Unity Hub URP, HDRP, VR, or AR template. VRChat’s Getting Started documentation directs manual Hub users to a standard 3D project and states that VRChat does not use URP or HDRP. Creator Companion supplies the intended World and Avatar templates.
Follow Create a VRChat Unity Project with Creator Companion for the full first-project and first-open checks.
Open an Existing Project Safely
Before opening an existing project:
- Find
ProjectSettings/ProjectVersion.txtin its project root. - Read the Unity Editor version recorded there.
- Confirm that Editor is installed.
- Preserve a backup or version-control checkpoint.
- Open the project with the matching Editor.
Opening a project in a different Editor can trigger an upgrade. Do not continue with an unintended upgrade merely because Hub offers a newer version.
For VRChat projects, open and manage the project through Creator Companion whenever possible.
Installation Checklist
| Check | Expected result |
|---|---|
| Hub | Current stable Unity Hub launches and signs in |
| License | Correct active license appears under Licenses |
| Editor | Exact VRChat-supported Unity version appears under Installs |
| Modules | Required Android or iOS support is attached to that Editor |
| Creator Companion | Detects the supported Editor |
| Project creation | World or Avatar project is created through Creator Companion |
Keep the Current Unity Version page bookmarked. The supported version is a project requirement, not a preference.
Troubleshooting
Unity Hub asks me to activate a license.
Sign in, open Licenses, and confirm the intended license. For eligible Unity Personal users without an active license, select Add license > Get a free personal license and accept the current terms.
The VRChat-supported Editor is not listed under official releases.
Use the installation link on VRChat’s Current Unity Version page. If the version is archived, follow its Unity Hub archive link instead of selecting a different release.
Add modules is missing for the installed Editor.
The Editor was probably installed outside Hub. Unity documents that Add modules works with Hub-installed Editors; reinstall that exact Editor through Hub before adding the required modules.
Creator Companion cannot detect the installed Editor.
Confirm the exact version under Hub > Installs, then refresh or locate the Editor in Creator Companion’s settings. Do not point the project at another installed version simply because it is detected.
Hub opens the project with the wrong Unity version.
Close the Editor without accepting an unintended upgrade. Read ProjectSettings/ProjectVersion.txt, install the required version, preserve a backup, and reopen the project with that Editor.
The Editor installation or module download fails.
Check free disk space, Hub sign-in, network access, and the Downloads status. Retry the failed Editor or module only after confirming the destination drive and required version.
Continue Learning
- Create a VRChat Unity Project with Creator Companion
- Unity3D Version Differences
- Unity Version Guide for VRChat Creators
- Fix Invalid Package Dependencies in Unity
- Find Answers in Unity and VRChat Documentation
Official References
- Unity: Install the Unity Hub
- Unity: Install Hub on Windows or macOS
- Unity: Manage Licenses
- Unity: Download and Install the Editor
- Unity: Add Modules to an Editor
- VRChat Current Unity Version
- VRChat SDK Getting Started
Next Step
Confirm the supported Editor and required modules under Hub > Installs, then create an empty World or Avatar project through Creator Companion.
