Unity Lighting for VRChat Worlds
Unity separates scene lighting into environment settings, Light components, lightmaps, light probes, and reflection probes. For a static VRChat environment, baked lighting moves most lighting calculations into editor-generated data instead of calculating every light and shadow at runtime.
Build one complete baked-lighting test before tuning final resolution or adding decorative lights.
- Open Window → Rendering → Lighting and create a Lighting Settings asset.
- Mark static environment renderers Contribute GI and set their main lights to Baked.
- Add Light Probes through occupied spaces, then select Generate Lighting.
VRChat currently uses Unity 2022.3.22f1 and the Built-in Render Pipeline. Its Android guidance calls baked lighting essential, recommends extensive use of light probes, and advises keeping lightmap resolution low. It describes realtime lights as very expensive on Android.
Lighting Guide Index
| Task | Guide |
|---|---|
| Learn Light components, modes, and the basic vocabulary | Introduction to Unity3D Lighting |
| Set a skybox, ambient source, sun, fog, and environment reflections | Set Up a Skybox and Environment Lighting |
| Produce a first Unity lightmap bake | Continue with the workflow on this page |
| Configure Unity’s Progressive GPU Lightmapper | Use the Progressive GPU Lightmapper in Unity 2022.3 |
| Use the Bakery asset instead of Unity’s built-in lightmapper | Install and Bake with Bakery GPU Lightmapper |
| Review lighting alongside other world costs | Unity Performance Basics for VRChat Worlds |
Baked, Mixed, and Realtime Lights
Set a Light component’s Mode in its Inspector.
| Light mode | Unity behavior | Use in a VRChat world |
|---|---|---|
| Baked | Unity calculates direct and indirect lighting before runtime and stores the result in lightmaps and light probes | Static architecture and scenery |
| Mixed | Combines baked and realtime work; the exact behavior depends on the Lighting Settings asset’s Lighting Mode | A limited light that must also affect dynamic objects or produce selected realtime shadows |
| Realtime | Unity calculates and updates the light every frame | A runtime effect that cannot be represented by baked data |
Mixed lights require more runtime calculation than fully baked lights. Their baked contribution also consumes memory, so use them only when the scene requires both behaviors.
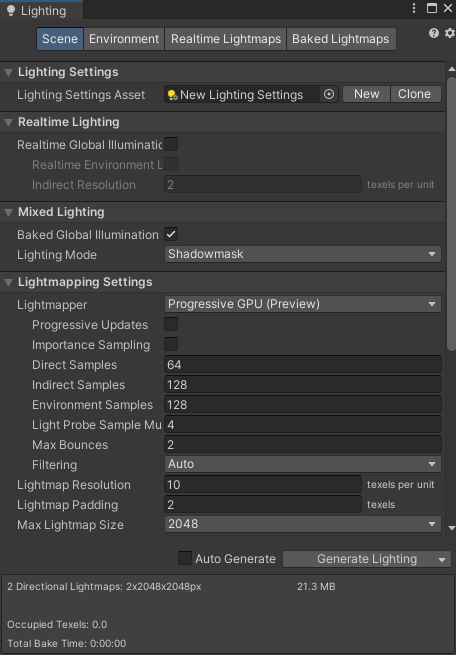
1. Create a Lighting Settings Asset
- Open Window → Rendering → Lighting.
- Select the Scene tab.
- Select New Lighting Settings.
- Save the generated asset with the project’s other scene settings.
- Confirm Baked Global Illumination is enabled.
The Scene tab controls the active Lighting Settings asset, realtime and mixed lighting settings, lightmapping settings, and bake workflow. A Lighting Settings asset can be assigned to more than one scene when those scenes need the same lightmapping configuration.
2. Set the Environment Lighting
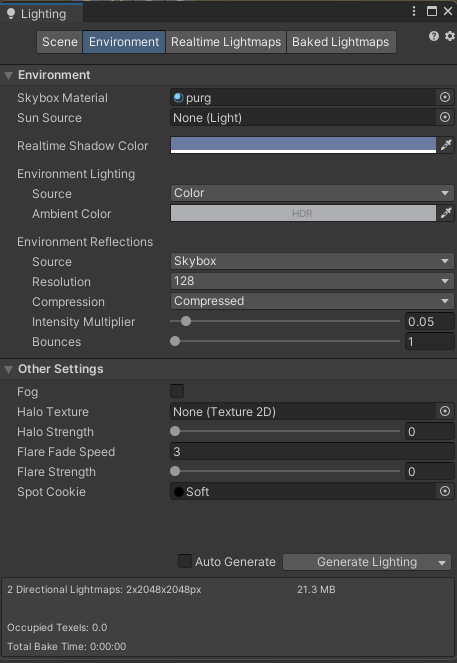
Select the Environment tab in the Lighting window. The available controls include:
- Skybox Material for the scene background
- the ambient lighting source
- environment reflection settings
- the Sun Source
- fog settings
The skybox can affect both the visible background and the scene’s ambient lighting. Complete this environment pass before judging individual lights.
3. Prepare Renderers for Lightmapping
A renderer must meet Unity’s lightmapping requirements before it can receive baked lightmap data:
- Select a static environment object.
- Enable Contribute GI in its static settings.
- For an imported mesh, open its Model Import Settings and enable Generate Lightmap UVs when it does not already contain suitable non-overlapping lightmap UVs.
- Use a Built-in shader with a Meta pass, such as Unity’s Standard shader, so the lightmapper can read the material.
- Repeat for the walls, floors, ceilings, terrain, and other scenery that should enter the bake.
Terrain components can also contribute to lightmaps. Movable objects should receive the baked environment through Light Probes instead of being marked as static lightmapped scenery.
4. Configure the Main Lights
Select each Light GameObject and set its Mode.
For a first static-world bake:
- set the main Directional Light to Baked
- set static room lights to Baked
- remove duplicate or overlapping lights that do not change the result
- reserve Mixed or Realtime for a verified runtime requirement
The Light Explorer at Window → Rendering → Light Explorer provides a table for reviewing multiple lights and their settings.
5. Add Light Probes
Lightmaps store baked lighting on static surfaces. Light Probes store sampled lighting in the empty space between those surfaces so moving objects can receive an approximation of the baked indirect light.
- Create an empty GameObject.
- Add a Light Probe Group component.
- Place probe points through spaces occupied by players and movable objects.
- Include probes on both sides of strong lighting transitions, such as doorways or the edge of a bright stage.
- Keep the probe volume connected through the playable area.
Unity interpolates nearby probe values for dynamic renderers. This prevents movable objects from relying only on their material or realtime lights while standing inside a baked environment.
6. Add Reflection Probes
Reflection Probes capture the surrounding scene into cubemaps used by reflective materials.
Add a probe when metallic or glossy materials should reflect a local room rather than only the scene-wide environment:
- Select GameObject → Light → Reflection Probe.
- Position and size its influence volume around the room.
- Use Baked for a static environment.
- Bake the probe after the room’s lighting and visible geometry are ready.
Reflection Probes affect reflections; they do not replace Light Probes or lightmaps.
7. Generate and Inspect the Bake
- Open Window → Rendering → Lighting.
- Disable Auto Generate when you want manual control over bake timing.
- Select Generate Lighting.
- Wait for the progress indicator to finish.
- Inspect the Baked Lightmaps tab.
- Enter Play mode and inspect the world from spawn, social areas, doorways, stairs, mirrors, and other occupied positions.
Manual generation adds lighting data, baked lightmap textures, and baked reflection data to the project. Keep those generated assets with the scene when backing up or sharing the project.
Video Example
The following existing tutorial demonstrates a simple scene-level lighting pass before the more focused guides above.
Help! An object does not appear in the baked lightmap.
Confirm the object has a Mesh Renderer or Terrain component, has Contribute GI enabled, uses a compatible material, and has suitable lightmap UVs. Then generate the lighting again.
Help! Movable objects look black or disconnected from the room.
Add Light Probes through the occupied volume and rebake. Confirm the movable object’s Mesh Renderer has Light Probes set to Blend Probes, which is Unity’s default.
Help! Metallic materials reflect the wrong room.
Add or reposition a Reflection Probe, adjust its influence volume, and bake it after the room geometry is final. Check the Environment tab as well because its reflection settings provide the scene-wide fallback.
Help! A Baked light behaves like a Realtime light.
Open the Lighting window and enable Baked Global Illumination. Unity forces Baked and Mixed lights to behave as Realtime lights when baked global illumination is disabled.
Help! The Android version is too expensive.
Replace realtime lighting with baked lighting where possible, use Light Probes for movable objects, reduce lightmap resolution, remove unnecessary realtime shadows, and test the Android build again. These steps follow VRChat’s Android world-lighting guidance.
Official References
- VRChat: Current Unity Version
- VRChat SDK: Getting Started
- VRChat: Android Content Optimization
- Unity 2022.3 Manual: Lighting window
- Unity 2022.3 Manual: Light modes
- Unity 2022.3 Manual: Lightmapping
- Unity 2022.3 Manual: Light Probes
- Unity 2022.3 Manual: Reflection Probe
