How to Upload a World in VRChat
Uploading a world to VRChat is the final step after your scene is built and configured correctly inside Unity. The Build & Publish button depends on several checks: project setup, scene descriptor, spawn points, Builder validation, account status, and the selected platform.
This guide explains the full beginner workflow, including what to check before uploading, what the SDK is validating, and what to confirm after the world is live.
Build and test a simple saved scene before publishing it publicly.
- Fix red Console errors before opening the Builder.
- Confirm the scene has a
VRC Scene Descriptorand valid spawn points. - Use Build & Test before Build & Publish.
The SDK Builder is validating a VRChat world, not just a Unity scene. Descriptor setup, account login, package state, and upload permissions all matter.
Playlist Companion
This page now includes the closest playlist video match for the publish step, plus the two Quest-focused follow-ups creators usually need once the first Windows upload is already working.
Uploading the finished world
Quest and Android follow-up references
- Easy Quest Switch, a MUST for quest world creators - Udon / VRChat SDK3.0
- Making Quest Content | VRChat SDK Tutorial
What Must Be Ready Before You Upload
Before you try to publish anything, confirm the following:
- The project opens without red Console errors
- You are using the correct Unity version for the VRChat Worlds SDK
- The Worlds SDK is installed through VCC
- You are signed in to the VRChat SDK inside Unity
- Your scene has a
VRC Scene Descriptor - Your scene has at least one valid spawn point
- The scene has been saved
If any of those are missing, the upload process will usually stop before the publish step.
World Upload Readiness Checklist
| Check | What Good Looks Like | Why It Matters |
|---|---|---|
| Creator Companion project | The project is a Worlds project created or managed through VCC. | Keeps the Worlds SDK, packages, and supported Unity version aligned. |
| Correct scene | The scene you intend to publish is open, saved, and named clearly. | Prevents accidentally uploading an empty test scene or older copy. |
| Scene descriptor | A root object has a valid VRC Scene Descriptor. |
VRChat needs it to treat the Unity scene as a world. |
| Spawn setup | At least one spawn transform is assigned and placed above walkable ground. | Players need a reliable entry point into the world. |
| Console state | Red Console errors are fixed before opening the Builder. | Compile errors can block or distort SDK validation. |
| Test pass | Build & Test has been run before the live upload. | Testing catches spawn, lighting, interaction, and performance issues before other users see them. |
What the Upload Process Actually Does
When you upload a world, the SDK does more than just send your scene to VRChat. It also:
- Validates the scene setup
- Checks for missing required components
- Builds the world for the target platform
- Packages the data for upload
- Uploads world metadata such as the title, description, and image
That is why many "upload errors" are actually scene setup errors.
1. Open the Correct Scene
If your project contains more than one scene, make sure you are working in the right one.
- Open Unity.
- Open the exact scene you want to publish.
- Save the scene.
- If your world uses baked lighting, confirm the lighting data is current.
Beginners sometimes edit one scene and accidentally upload another. The simplest way to avoid that is to:
- Keep your main publishable scene in
Assets/Scenes - Name it clearly, such as
MainWorld.unity
2. Make Sure the Scene Has a VRC Scene Descriptor
The VRC Scene Descriptor tells VRChat that the scene is intended to be a VRChat world. Without it, the SDK cannot publish the scene correctly.
To check it:
- Find the object in the Hierarchy that contains
VRC Scene Descriptor. - Select it.
- Confirm the component exists and is enabled.
The descriptor controls important world behavior, including:
- Spawn settings
- Capacity
- Reference camera behavior
- Respawn height
- Optional world settings
If your world does not have this component, add one to a suitable root object.
VRC Scene Descriptor has been added.3. Set Up Spawn Points Properly
A world needs a valid place where players can appear when they join.
For a basic setup:
- Create one or more spawn point transforms.
- Place them above the floor, not inside geometry.
- Make sure the spawn direction faces a sensible part of the room.
- Assign those spawn references in the
VRC Scene Descriptor.
Beginner mistakes with spawn points include:
- Spawns placed too low so players clip into the floor
- Spawns placed inside walls or props
- Spawns facing backward into a wall
- Forgetting to assign the spawn references to the descriptor
If a test player spawns in the wrong place, fix the transform positions first before troubleshooting more advanced systems.
4. Review Basic World Settings
Before building, quickly review the scene descriptor settings that affect player experience.
Important settings to think about:
- Capacity: how many players the world is designed to support
- Respawn Height: how far a player can fall before they reset
- Spawns: where players appear
- Content and interactions: whether the scene includes anything broken or unfinished
For beginners, keep the first upload simple. A clean, stable first version is better than a complicated broken one.
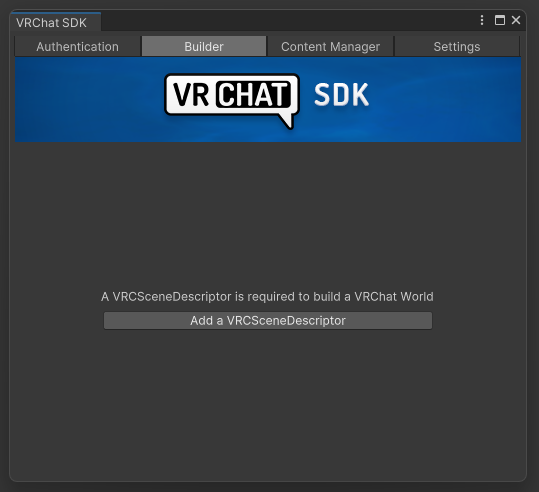
5. Open the VRChat SDK Builder
Once the scene is ready:
- Open VRChat SDK -> Show Control Panel.
- Go to the Builder tab.
- Wait for the SDK to finish its checks.
The Builder tab is where VRChat tells you what is blocking the upload. Read the errors carefully. Beginners often click the upload button repeatedly without fixing the actual issue first.
6. Resolve All Blocking Errors
When the Builder reports problems, fix them before continuing.
The most important error types are:
Compile errors
If the Console has red C# errors, the world usually cannot build correctly. Fix these first.
Missing VRC Scene Descriptor
Without this component, the world is not valid for upload.
Invalid or missing spawns
Players need a valid entry point into the world.
Missing references
Broken object references can cause world features to fail or prevent a successful build.
Platform-related issues
Some shaders, scripts, or assets may not behave correctly depending on the build target and project setup.
After every major fix, run the validation again.
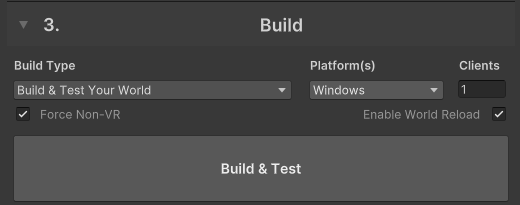
7. Use Build & Test First
Before publishing publicly, use Build & Test.
This step is extremely useful for beginners because it lets you see whether the world actually behaves correctly before it goes live.
- Click Build & Test.
- Wait for the build to complete.
- Enter the local or test version.
- Check the important parts of the world:
- Spawn position
- Walking/navigation flow
- Lighting
- Audio
- Materials and textures
- Interactions
- Performance in the busiest areas
If the world fails in testing, fix the issue first. Do not rely on the live publish as your first real test.
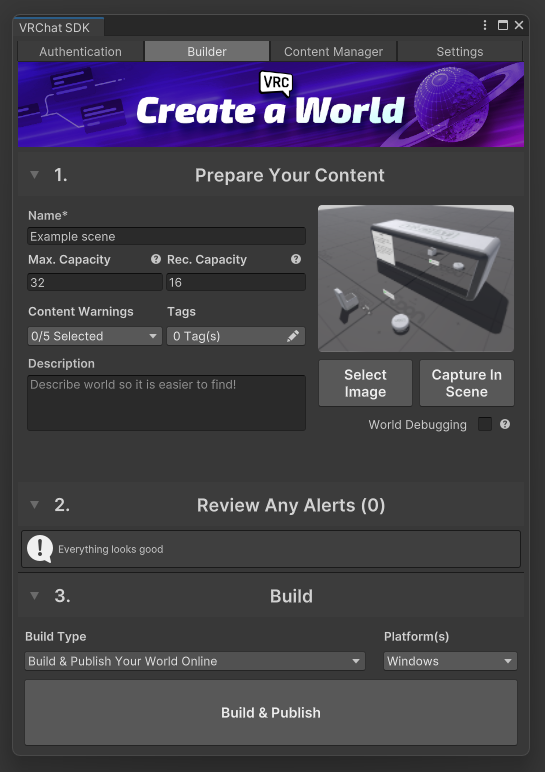
8. Build and Publish
Once the world passes validation and testing:
- Go back to the Builder tab.
- Click Build & Publish for Windows.
- Wait for the build step to finish.
- Fill in the world information when prompted:
- World name
- Description
- Thumbnail or image
- Visibility setting
Visibility options may include things like:
- Private
- Friends
- Group-based access
- Public
The exact options available depend on your account status and VRChat permissions.
For a first upload, many creators prefer a restricted visibility option until they confirm the world works correctly with other people.
Platform Notes for PC and Quest
For a beginner workflow, get the Windows upload working first. A Quest or Android-compatible version is a separate target with stricter performance and component expectations, even when it shares the same world ID.
When preparing a cross-platform world:
- Keep one source project organized enough that you can switch targets intentionally.
- Check shaders, textures, lights, scripts, and world components against Android/Quest limitations.
- Re-test after changing build target because a scene that works on Windows can still fail or perform badly on Quest.
- Keep the world metadata consistent so players understand they are entering the same world entry across platforms.
If the page you are following focuses on a first upload, treat Quest support as the next pass after the basic publish path works.
9. Choose Good Metadata
The metadata matters because it affects how people understand and find your world.
World name
Keep it short, clear, and readable.
Description
Explain what the world is for. Examples:
- Social hangout
- Showcase space
- Event room
- Testing world
Thumbnail
Use an image that clearly represents the world. Avoid random screenshots that do not show the actual environment well.
10. Wait for Upload Confirmation
After you confirm the upload:
- Let the process finish completely.
- Watch for the SDK success message.
- Do not close Unity during the upload.
If the upload hangs or fails, note the exact error rather than guessing.
11. Verify the World in VRChat
After the upload completes:
- Open VRChat.
- Visit the world page.
- Launch an instance.
- Test the world in the live environment.
Check:
- Whether the thumbnail and metadata look correct
- Whether you spawn in the right place
- Whether audio and lighting still behave correctly
- Whether interactions still work
- Whether the world performance feels acceptable
Testing inside VRChat matters because some issues do not show clearly until the world is running in the actual platform.

Good Beginner Habits After Uploading
Once your world is live, use a cleaner release workflow:
- Keep backup scene versions
- Make one change group at a time
- Use private or limited visibility for early testing
- Test with at least one other player
- Write simple release notes for yourself
Even a text file with notes like this helps:
v01 first uploadv02 fixed spawn rotationv03 optimized lights and updated thumbnail
Common Beginner Mistakes
Help! Should I publish before testing?
Use Build & Test first whenever possible. It helps separate scene problems from live upload problems before other players see the world.
Help! The Console has red errors.
Stop and fix red errors before publishing. Compile errors can prevent the SDK from building correctly even if the scene looks fine in the editor.
Help! I forgot the descriptor or spawns.
Add a VRC Scene Descriptor, assign valid spawn points, save the scene, then return to the Builder tab and run validation again.
Help! Should my first release be public?
A private or limited first upload is usually safer. Test the world with one or two people, fix obvious issues, then widen visibility when it behaves correctly.
Help! The Windows build works, but Quest does not.
Treat Quest as its own optimization and compatibility pass. Check the active build target, shaders, texture sizes, lights, scripts, Udon behavior, and allowed components before assuming the upload process itself is broken.
If the Upload Fails
If the world will not publish, move to a structured troubleshooting process instead of random changes.
Use the next guide:
World Upload Troubleshooting Checklist
Official References
- VRChat Worlds
- Creating Your First World
- VRC Scene Descriptor
- World Components
- Allowlisted World Components
- World Creation, Optimization, and Community Labs Tips