Your first VRChat world guide
This beginner walkthrough covers the minimum steps to build, test, and upload your first VRChat world.
The goal is not to make the most impressive world immediately. The goal is to prove that your Creator Companion project, Unity setup, SDK Builder, scene descriptor, and upload loop all work.
Keep the first world deliberately small so you can learn the project, validation, and upload loop.
- Create a Worlds project in VCC and open it in Unity.
- Add a simple hangout space, spawn point, and VRC Scene Descriptor.
- Fix SDK Builder errors, run Build & Test, then keep the first upload private while you review it.
Your first upload should prove the pipeline works. Save complex art, Udon systems, and public release polish for later versions after the basic build and test process is reliable.
1. Create a New Project in VCC
- Open VCC and create a new Worlds project.
- Install required packages.
- Open in Unity.
Use the Creator Companion for your first world unless you have a specific reason not to. It handles the currently supported Unity version, project type, and VRChat SDK packages more safely than a manual setup.
Before moving on, confirm:
- the project type is Worlds, not Avatars
- the project opens in the Unity version VRChat supports
- the VRChat SDK menu appears in Unity
- the Console is not full of red compile errors
2. Build a Simple Test Scene
Start with:
- Ground/floor
- A few walls or props
- Lighting pass
- A clear spawn location
Keep the first scene intentionally plain. A good first upload might be nothing more than a floor, a few walls, a light, and one place for players to spawn.
For most beginners, a tiny hangout room is the safest first scope. It gives you enough world shape to test scale, lighting, spawn direction, walking paths, and comfort without hiding the upload workflow under a pile of imported systems.
A simple first hangout room can include:
- one main floor area
- one obvious entrance or spawn-facing view
- two or three simple props for scale
- a single baked or simple light setup
- a sign or landmark that helps you recognize the upload
- enough empty space to walk around without clipping into walls
Save mirrors, video players, complex shaders, large asset packs, and synced Udon systems for a later version. Those are good world features, but they make the first troubleshooting pass harder.
Avoid adding these until the basic upload loop works:
- large asset packs
- complex Udon systems
- video players
- mirrors
- custom shaders
- dozens of imported prefabs
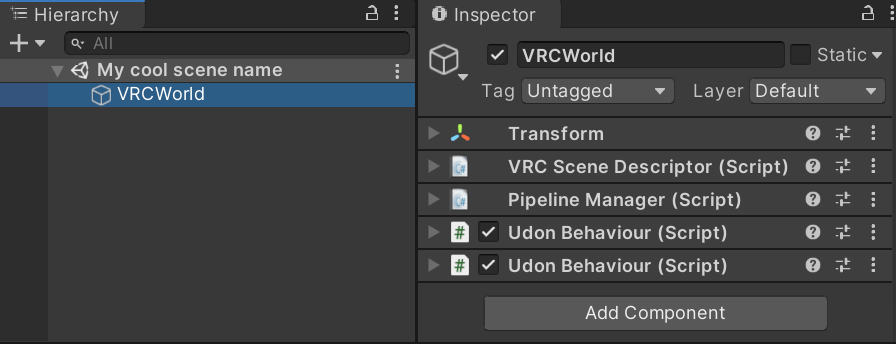
3. Add VRChat Scene Components
- Add a
VRC Scene Descriptorto your scene. - Configure spawns.
- Save scene in
Assets/Scenes.
The VRC Scene Descriptor is required for every scene you want to build as a VRChat world. It tells the SDK that this Unity scene is a world and gives VRChat important world settings such as spawn behavior.
For a first world, keep the spawn simple:
- create an empty GameObject for the spawn
- place it above the floor
- face it toward the main area
- assign it in the Scene Descriptor
- test that you do not spawn inside geometry
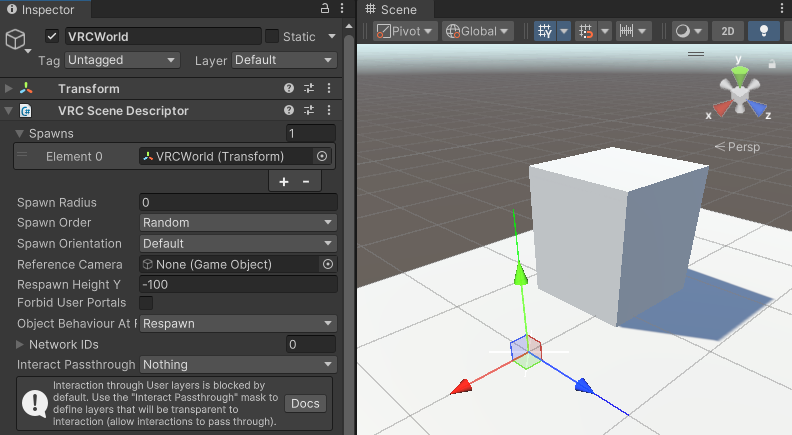
VRC Scene Descriptor so new players enter the world in the right place.4. Validate Before Upload
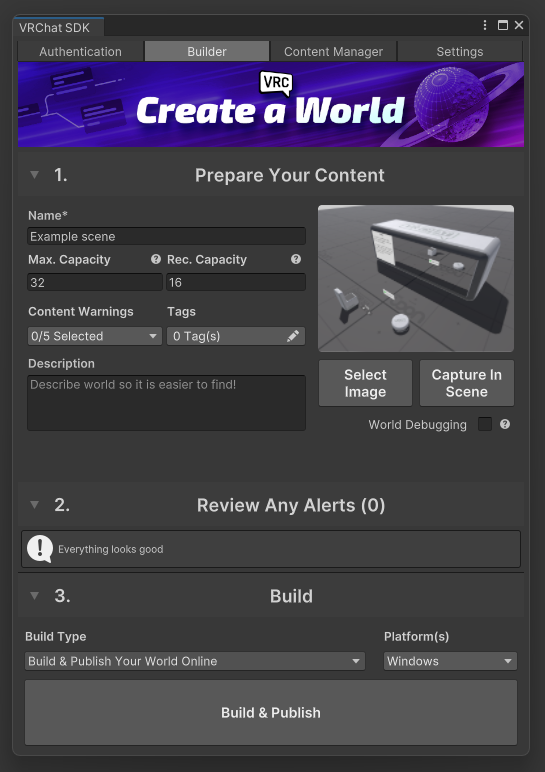
- Open VRChat SDK Control Panel.
- Resolve all errors in Builder checks.
- Run Build & Test.
Treat SDK Builder messages as your checklist. If the Builder says the world is missing something, fix that specific issue before trying random scene changes.
Use Build & Test before publishing. This creates a local test build so you can enter the world and check spawn, scale, lighting, collision, basic navigation, and obvious SDK problems before upload.
5. Upload the World
- Use Build & Publish.
- Set world name, description, capacity, content settings, tags, and thumbnail.
- Start with a private upload or local test workflow while you review the world.
Your first upload is a test of the pipeline. After it works, you can improve art, performance, interactions, screenshots, and release notes in later versions.
Keep the metadata plain and honest:
- Use a world name that matches the actual scene.
- Write a short description that explains what the world is right now.
- Choose capacity values that match the space you tested, not the dream version of the world.
- Use tags only when they genuinely describe the world.
- Pick a thumbnail that shows the actual room or test scene.
Do not treat the first thumbnail as marketing polish. For a first private upload, the thumbnail mainly helps you recognize the world later in VRChat or the SDK Content Manager.
Tips for First-Time Creators
- Keep scope small for first publish.
- Prioritize navigation clarity over detail.
- Always test with at least one other player.
- Use VRChat's supported Unity version.
- Save the scene before opening the SDK Builder.
- Fix red Console errors before testing upload.
- Keep a copy of the project before major changes.
- Test desktop and VR movement if the world is meant for both.
First World Readiness Checklist
| Area | Check |
|---|---|
| Project setup | Created as a Worlds project in Creator Companion |
| Unity version | Matches the current VRChat-supported Unity version |
| Scene basics | Floor, lighting, spawn, and simple player path exist |
| VRC Scene Descriptor | Present and configured with at least one spawn |
| Console | No red compile errors |
| SDK Builder | Errors resolved before publishing |
| Test build | Build & Test works locally |
| Metadata | Name, description, capacity, tags, and thumbnail match the actual world |
| Visibility | First upload stays private or in a limited review state while you test it |
Common Mistakes
Help! I used the wrong Unity version.
Create or reopen the project through VCC and use the Unity version recommended for the active VRChat SDK. Avoid manually upgrading Unity until the SDK supports that version.
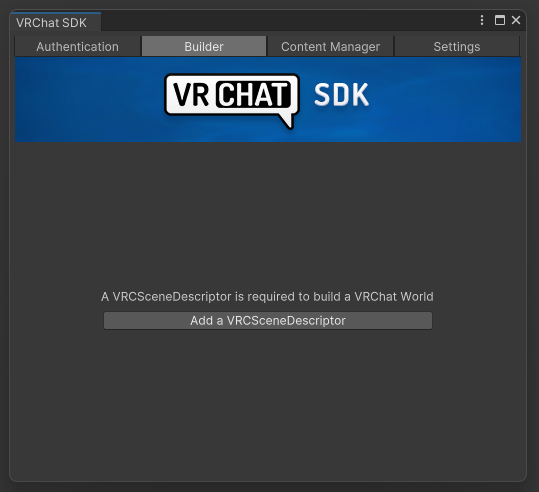
The SDK says my world is missing a VRC Scene Descriptor.
Add a VRC Scene Descriptor to a scene object, assign at least one valid spawn, save the scene under Assets/Scenes, and re-run Builder validation.
Can I upload while the Console has red errors?
No. Fix compile errors before uploading. Red Console errors can stop SDK tools, Udon scripts, or project validation from working correctly.
Help! My project behaves like an avatar project.
Check Creator Companion and confirm the project was created with the Worlds template and Worlds SDK. If the wrong SDK is installed, create a fresh Worlds project rather than trying to force an avatar project into a world.
Should my first world be public?
Usually no. Publish privately or with limited visibility first, test with friends, fix comfort and performance issues, then prepare a cleaner public release later.
After Your First Upload
Once the first upload or local build works, do a short review pass before adding more features.
Check:
- You spawn in the intended location and face the right direction.
- The world scale feels reasonable in desktop and VR if both matter for the world.
- There is no obvious place to fall forever or get stuck.
- The lighting is readable without being too bright.
- The world name, description, and thumbnail still match what you uploaded.
- The SDK Content Manager or VRChat website shows the world you expect.
- You know what the next change will be before importing more assets.
If you want the world to become public later, read VRChat's Community Labs and public-world guidance before submitting it. Public release is a separate quality and compliance step, not the same thing as proving your first upload works.
Next Steps
- Add your first interactive button.
- Improve optimization in the busiest area of the world.
- Add one feature at a time and test after each change.
- Prepare versioned updates with clear notes so you know what changed.
Helpful follow-up pages
- World Creation
- World Building
- Fix Your First Broken VRChat Project
- World Upload Troubleshooting Checklist
- Understanding World Performance
- Unity Version Guide for VRChat Creators
Final Advice
Your first VRChat world should be small, testable, and easy to fix. Once you can create, validate, Build & Test, and publish a basic scene, every later improvement becomes less stressful.
Related Navigation
Official References
- VRChat Creating Your First World - reviewed 2026-05-27.
- VRChat VRC Scene Descriptor - reviewed 2026-05-27.
- VRChat Current Unity Version - reviewed 2026-05-27.
- VRChat World Creation, Optimization, and Community Labs Tips - reviewed 2026-05-27.
- VRChat Creator Companion Documentation - reviewed 2026-05-27.