ProBuilder Blockout Workflow for VR Worlds
Blockout is the stage where you design the shape and flow of a world before worrying about polished art. In VR, this step is even more important because players experience scale and movement more intensely than they do on a flat screen.
If a room feels too small, a doorway feels awkward, or a social area feels confusing, those problems are better discovered during blockout than after you have already built detailed art around them.
ProBuilder is ideal for this stage because it lets you change geometry quickly without needing to round-trip through external 3D software every time you want to move a wall or widen a corridor.
Build the rough shape, test it from player height, adjust quickly, then lock the layout before art polish begins.
- Create the spawn, main path, and primary social area with large simple ProBuilder shapes.
- Use snapping or ProGrids-style increments so walls, floors, stairs, and platforms stay consistent.
- Walk the blockout repeatedly and only move into art once scale, flow, and gathering areas feel right.
For VRChat worlds, blockout is where you solve comfort, scale, player flow, gathering patterns, and event usability before expensive art, lighting, mirrors, and systems make changes harder.
Playlist Companion
These videos fit this blockout page directly because they cover early world modeling, greyboxing, and fast in-Unity structure work before final art takes over.
ProBuilder for grey-boxing in Unity
3D modeling with ProBuilder in Unity
VRChat project-scale follow-up: Modeling - Create Your First VRChat World
What a Good Blockout Should Answer
A blockout does not need to look impressive. Its job is to answer practical questions such as:
- Does the world feel comfortable to move through?
- Are rooms the right size?
- Can players understand where to go?
- Are social spaces readable and inviting?
- Are important areas visible and easy to find?
- Is the layout likely to stay performant?
If your blockout answers those questions well, the later art pass becomes much easier.
The Blockout Phases
| Phase | What you build | What you are testing |
|---|---|---|
| Rough massing | Floors, walls, ceilings, big platforms, primary routes | Does the world shape make sense at all? |
| Player flow | Spawn, paths, transitions, destinations, bottlenecks | Do players know where to go and where to gather? |
| Scale pass | Doorways, stairs, ceilings, seating, stages, counters | Does the space feel comfortable from avatar height? |
| Social pass | Conversation pockets, event zones, quiet corners, viewpoints | Does the world support how people actually behave in VRChat? |
| Lock pass | Clean hierarchy, named zones, stable dimensions, notes for art | Is the layout ready to survive the art pass? |
You do not need to finish each phase perfectly before touching the next one, but the order helps. A pretty blockout with bad flow is still a bad blockout.
How ProBuilder, Snapping, And Polybrush Fit Together
Use the tool sequence from the related ProBuilder pages:
- ProBuilder: make and reshape the rough world structure.
- Built-in snapping or ProGrids-style snapping: keep modular walls, floors, stairs, and platforms aligned.
- Polybrush: add surface variation later, after layout and scale are stable.
Do not use detail tools to hide a weak layout. If the room feels wrong, fix the blockout first.
Start With the Right Mindset
Beginners often make the mistake of decorating too early. The goal of blockout is not to make the world pretty. The goal is to make the world work.
At this stage, prioritize:
- Scale.
- Navigation.
- Sightlines.
- Interaction zones.
- Layout clarity.
- Social comfort.
Avoid prioritizing:
- Final materials.
- Detailed props.
- Fancy lighting polish.
- Small decorative clutter.
- Fine surface variation.
1. Establish a Scale Reference
Before building rooms, give yourself a reference for human size.
You can use:
- A Unity capsule
- A simple humanoid placeholder
- A known character-height reference object
This helps you judge:
- Door height.
- Ceiling height.
- Stair size.
- Table height.
- Corridor width.
- Stage and seating visibility.
- Mirror, portal, and interaction placement.
In VR, spaces that look fine in the editor can still feel uncomfortable when experienced at player scale. That is why scale references should be used early, not as an afterthought.
2. Begin With the Most Important Spaces
Do not try to build the entire world evenly all at once.
Start with the core areas first:
- Spawn area.
- Main social area.
- Primary path between key spaces.
- Major feature area such as a stage, viewing area, or central room.
- Any mirror, video, portal, or event area that will shape crowd behavior.
This gives you the fastest feedback on whether the world concept is actually working.
If the core area already feels confusing or too empty, that usually means the rest of the world should not be expanded yet.
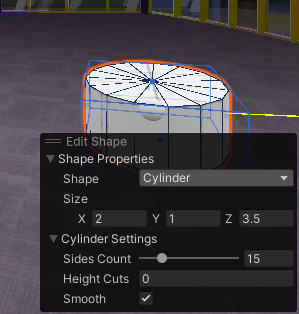
3. Create Large Simple Shapes First
Use ProBuilder to create the broad structure before adding smaller forms.
Good first-pass geometry includes:
- Floors.
- Walls.
- Ceilings.
- Ramps.
- Stages.
- Large platforms.
- Main corridors.
- Simple landmark shapes that help players orient themselves.
At this stage, use simple shapes:
- Cubes.
- Planes.
- Extruded walls.
- Basic stairs.
- Placeholder ramps or platforms.
The cleaner the first pass is, the easier it becomes to iterate.

4. Build for Player Flow, Not Just for Looks
One of the most important ideas in world blockout is player flow.
That means thinking about:
- Where players enter
- Where they naturally walk next
- Where they stop
- Where they gather
- Where they might get stuck or lost
A beautiful-looking blockout is not useful if players cannot understand the space.
As you block out, ask:
- Does the spawn area clearly point toward the main destination?
- Are there obvious paths?
- Is there too much dead space?
- Are there bottlenecks that will feel bad with more players?
- Can late joiners understand the room quickly?
- Does the layout support small conversations as well as larger gatherings?
5. Use ProBuilder Extrude and Edit Tools Carefully
Once the broad structure exists, begin shaping the layout with ProBuilder tools.
Common useful actions include:
- Extruding faces to extend rooms or corridors.
- Adjusting vertices to refine simple shapes.
- Duplicating repeated layout pieces.
- Creating platforms and steps.
- Beveling or softening only when the shape needs it for readability.
Try to keep the geometry readable and intentional. A common beginner mistake is repeatedly editing shapes until the mesh becomes messy and hard to manage.
If a structure becomes confusing:
- Duplicate a clean version first
- Simplify it again
- Rebuild the section more cleanly

6. Define Interaction and Social Zones Early
Even if no interactive systems are built yet, mark out where they will probably go.
Examples:
- Main conversation area
- Stage or presentation zone
- Video or media viewing space
- Quiet corner
- Entry transition area
- Balcony or observation area
This matters because world layout is not just architecture. It is also behavior design. You are deciding where people are likely to stand, talk, gather, and move.
7. Test Sightlines and World Readability
VR worlds are easier to navigate when important destinations are readable from where the player stands.
Check the blockout for:
- Clear landmarks
- Interesting but understandable sightlines
- Visual cues that guide the player
- Important spaces that can be recognized at a glance
If every corridor looks the same, players may get disoriented.
If the entire world is visible at once, the layout may feel flat or lacking structure.
Good blockout often uses a balance of:
- Reveal
- Framing
- Curiosity
- Orientation
8. Walk the World Repeatedly
Do not judge the blockout only from the Scene view.
Test it by:
- Entering Play Mode
- Moving through the world from spawn
- Checking doorways, corners, stairs, and corridors
- Repeating the test after each major layout change
If the world is intended for VRChat, also think about:
- How multiple players will occupy the same space.
- Whether head height and room volume feel comfortable.
- Whether seating, platforms, mirrors, or event spaces feel natural.
- Whether Quest or desktop users will understand the same layout.
- Whether the blockout still works with realistic avatars near spawn and social areas.
9. Organize the Hierarchy While You Work
It is much easier to manage a blockout if the scene is structured cleanly.
Good practices:
- Group geometry by zone.
- Name objects clearly.
- Keep major spaces in obvious parent objects.
- Separate temporary reference objects from real layout objects.
- Mark pieces that are placeholders versus pieces likely to stay.
For example:
Blockout_SpawnBlockout_MainHallBlockout_StageBlockout_UpperWalkway
This saves a lot of time later when the blockout becomes the base for the real world.
10. Know When the Blockout Is Good Enough
A blockout is ready to move forward when:
- The world scale feels correct.
- The main paths are clear.
- Major room sizes feel right.
- Social or activity zones make sense.
- Spawn flow works for a first-time visitor.
- The hierarchy is organized enough that the art pass will not become chaos.
- You no longer need to move walls every five minutes.
That does not mean every small detail is solved. It means the overall structure is stable enough for the next pass.
Ready For Art Pass Checklist
Before moving beyond blockout, confirm:
- Spawn points toward the intended first destination.
- Doorways, ramps, stairs, ceilings, and platforms feel comfortable at avatar scale.
- The main social area works with more than one conversation happening.
- Sightlines reveal important spaces without showing the whole world at once.
- Performance-risk areas are known, especially mirrors, video, stages, and dense props.
- Blockout objects are grouped and named by area.
- A copy of the blockout scene has been archived.
- The next pass has clear notes about what should stay, change, or be replaced.
Common Beginner Mistakes
Detailing too early.
This is the most common mistake. If the layout is not proven yet, detail work is usually wasted effort. Keep the first pass simple until scale and flow are stable.
Ignoring scale.
A room can look fine in the editor and still feel wrong when experienced as a player. Use a height reference and test from normal avatar viewpoints.
Making spaces too large.
Huge empty areas can feel awkward, dead, and harder to optimize. Social VR spaces usually need comfortable gathering pockets, not only impressive scale.
Poor landmarks.
If every room has the same shape or color, orientation becomes harder. Add simple landmarks during blockout so players understand where they are.
Messy hierarchy and geometry.
Fast iteration is good. Uncontrolled chaos is not. Group objects by zone and clean up confusing mesh edits before the art pass starts.
Good Habits Before the Art Pass
Before replacing your blockout with finished art:
- Duplicate and archive the blockout scene.
- Freeze the major layout decisions.
- Clean up hierarchy names.
- Confirm the player flow still feels right.
- Mark which blockout pieces will stay and which will be replaced.
- Create notes for lighting, mirrors, portals, interaction zones, and performance risks.
This gives you a safe fallback if the polished art pass starts damaging the layout quality.
Why This Matters for VRChat
For VRChat worlds, blockout quality affects more than just visuals. It affects:
- Social comfort
- Wayfinding
- Performance planning
- Event flow
- Player gathering patterns
A strong blockout usually leads to a stronger final world, even if the final art changes significantly later.
Helpful follow-up pages
- Installing ProBuilder
- ProBuilder
- Installing ProGrids
- Polybrush
- Unity Performance Basics for VRChat Worlds
- World Building
- VRChat World Creation Guide
Next Step
Once the layout is working, continue with Unity Performance Basics for VRChat Worlds so the world stays efficient as you replace temporary geometry with real content.
Help! Should I use this tool in my main world immediately?
Try it in a test scene first. Once the workflow is clear, move the cleaned result into the main VRChat project.
Help! The tool created messy geometry or assets.
Clean naming, pivots, materials, and mesh organization before relying on the result. Tool output still needs normal world-building discipline.
References
- Unity ProBuilder package manual
- Unity ProBuilder create meshes documentation
- Unity ProBuilder materials, shaders, textures, and UVs documentation
- Unity Manual: Grid snapping
- Unity video: ProBuilder for grey-boxing in Unity
- Unity video: 3D modeling with ProBuilder in Unity
- Iconoclass video: Modeling - Create Your First VRChat World