ProBuilder in Unity 2022.3
ProBuilder creates and edits custom mesh geometry inside Unity. It is useful for room blockouts, collision meshes, temporary architecture, and shapes that need quick iteration while the scene remains playable.
Install the Unity 2022.3 package, create one measured shape, and learn the four edit modes before adding detail.
- Install ProBuilder from Window > Package Manager.
- Open Tools > ProBuilder > ProBuilder Window.
- Create a cube or stair shape, then edit it in Object, Vertex, Edge, and Face modes.
Use the VRChat SDK's local Build & Test workflow to check a blockout from the player view. The Scene view alone does not show how doorways, stairs, colliders, or materials behave in the VRChat client.
Package Support
Unity lists com.unity.probuilder version 5.2.4 as the released ProBuilder package for Unity 2022.3. ProBuilder 6 documentation targets Unity 6 and should not be used as the primary reference for a Unity 2022.3 project.
| Project | Documentation to use |
|---|---|
| Unity 2022.3 | ProBuilder 5.2 manual |
| Unity 6 | ProBuilder 6 manual |
Install and Open ProBuilder
- Open Window > Package Manager.
- Select Unity Registry.
- Select ProBuilder and click Install.
- Wait for Unity to finish resolving packages and compiling.
- Open Tools > ProBuilder > ProBuilder Window.
ProBuilder 3.0 and newer is distributed through Package Manager. The package identifier is com.unity.probuilder.
If the project uses URP or HDRP, Unity's ProBuilder installation guide instructs you to import the matching shader support from the package's Samples section so ProBuilder vertex colors and textures display correctly.
Create a Measured Shape
The Shape tool can create cubes, cylinders, stairs, doors, arches, pipes, planes, and other editable primitives.
- Activate the Shape tool.
- Choose a primitive.
- Enter X, Y, and Z dimensions in the Create Shape panel, or draw its bounding box in the Scene view.
- Set shape-specific properties such as stair count or cylinder sides.
- Create the shape and exit the tool.
- Select Edit Shape when the primitive dimensions need adjustment.
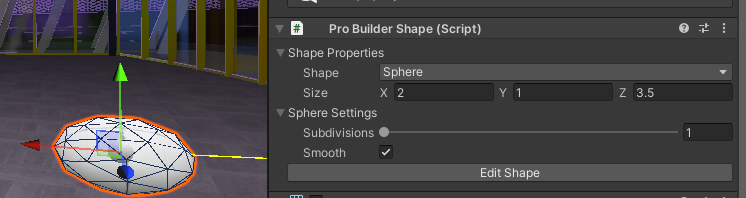
After splitting vertices, connecting edges, extruding faces, or otherwise changing topology, ProBuilder requires a shape reset before the original parametric shape can be edited again. A reset removes those manual topology changes.
Understand the Four Edit Modes
| Mode | Selection | Typical actions |
|---|---|---|
| Object | Entire mesh | Move the object, modify its pivot or normals, and merge objects. |
| Vertex | Individual points | Move, connect, or split vertices. |
| Edge | Lines between vertices | Adjust edge loops and perform edge editing. |
| Face | Polygon surfaces | Move, extrude, inset, delete, or assign materials to faces. |
Object mode is Unity's normal whole-object selection. Vertex, Edge, and Face are ProBuilder's Element modes. Select a mode from the Edit mode toolbar, choose the elements, then use ProBuilder actions or normal Unity transform controls.
Shift+Drag with a Unity transform control can extrude or inset selected elements.
Build a Simple Room
- Set Unity's built-in grid and move increments.
- Create a floor with measured dimensions.
- Create wall shapes that match the same unit system.
- Duplicate and snap walls into place.
- Use Face mode to move or extrude surfaces where a doorway or alcove is required.
- Apply distinct temporary materials to floors, walls, ceilings, and non-walkable surfaces.
- Add or inspect colliders.
- Run a local VRChat Build & Test before refining the mesh.
For a longer room-and-corridor sequence, follow ProBuilder Blockout Workflow for VR Worlds.
Edit Existing Geometry
ProBuilder actions can move and extrude elements, fill holes, split vertices, collapse edges, merge meshes, and detach geometry. A regular Unity mesh must be converted with ProBuilderize before ProBuilder tools can edit its elements.
Before a destructive edit:
- Duplicate the object or work in a copied scene.
- Select the exact mode and elements the action requires.
- Open the action's options when dimensions or behavior matter.
- Apply the action once.
- Inspect the topology, normals, UVs, and collider before continuing.
Bezier shapes and Boolean operations are marked experimental in the ProBuilder 5.2 documentation and may reduce stability. Use them on a copy rather than essential scene geometry.
Apply Materials and Correct UVs
ProBuilder can apply a material to an entire mesh or to selected faces. Texture placement is stored as UV coordinates on the mesh.
Use the UV tools when a texture is:
- stretched across a face;
- rotated in the wrong direction;
- using inconsistent tiling between adjacent faces;
- offset from neighboring modular pieces.
Adjust the UV offset, rotation, and tiling rather than changing the object scale to make a texture fit. Check every material slot after separating, merging, or exporting geometry.
Review Collision and Lighting
ProBuilder can create collision meshes, but collision still needs deliberate review:
- confirm walkable surfaces have the intended collider;
- remove or simplify collision that blocks doorways and narrow gaps;
- keep trigger volumes separate from visible geometry when they need different behavior;
- verify normals and backfaces before baking lighting;
- inspect lightmap UVs when the mesh will use baked lighting.
Run the checks again after topology changes. A visually correct face edit can still leave unsuitable collision or lightmap behavior.
Export to a Modeling Application
ProBuilder 5.2 exports:
| Format | Relevant capability |
|---|---|
| OBJ | Supports multiple textures and mesh groups. |
| STL | Stores triangle geometry and is commonly used by CAD or printing tools. |
| PLY | Supports quads and vertex colors, but not multiple materials. |
| Asset | Unity-only asset format. |
To export:
- Select the ProBuilder objects.
- Alt-click on Windows or Option-click on macOS over the Export button.
- Choose a format and its options.
- Click Export and save the model.
An exported file re-imported into Unity is not automatically a ProBuilder mesh. Use ProBuilderize if it must become editable with ProBuilder again.
Video Companions
These Unity videos demonstrate the greyboxing and in-editor modeling workflow. Their interface may differ from ProBuilder 5.2, so use the versioned manual for exact controls.
Troubleshooting
ProBuilder does not appear in Package Manager
Confirm Package Manager is showing Unity Registry and the project is open in its intended Unity version. Unity lists ProBuilder 5.2.4 as released for Unity 2022.3.
The ProBuilder menu is missing after installation
Wait for package resolution and script compilation to finish, then check Tools > ProBuilder. Resolve Console compile errors before reinstalling the package.
I cannot select vertices, edges, or faces
Confirm the object is a ProBuilder mesh, then select Vertex, Edge, or Face mode in the Edit mode toolbar. Convert a regular Unity mesh with ProBuilderize before editing its elements.
Edit Shape wants to reset my changes
Manual topology edits break the original parametric shape relationship. Resetting the shape removes those edits, so duplicate the object before deciding whether to return to Shape properties.
Textures are stretched or rotated
Select the affected faces and correct their UV offset, rotation, and tiling. Check that the intended material is assigned to those faces.
URP materials or vertex colors display incorrectly
Open ProBuilder in Package Manager and import the matching render-pipeline shader support from the Samples section, then apply a compatible material.
An exported mesh is no longer editable with ProBuilder
Exported and re-imported model files are regular meshes. Use ProBuilderize if the imported object must be converted back into a ProBuilder mesh.
Continue Learning
- Install ProBuilder in Unity 2022.3
- ProBuilder Blockout Workflow for VR Worlds
- Replace ProGrids with Unity Grid Snapping
- Polybrush in Unity 2022.3
- World Optimization Checklist
- Simple Occlusion Culling
Official References
- Unity 2022.3 Manual: ProBuilder package
- Unity ProBuilder 5.2 manual
- Unity ProBuilder 5.2: Installation
- Unity ProBuilder 5.2: Creating meshes
- Unity ProBuilder 5.2: Edit modes
- Unity ProBuilder 5.2: Materials, textures, and UVs
- Unity ProBuilder 5.2: Exporting and re-importing
- VRChat Creation: Build and Test a world
Related Navigation
Turn ProBuilder Blockouts Into Shippable VRChat Worlds
Use ProBuilder for the first playable layout, then clean up geometry, materials, colliders, and scale before treating the blockout as production world content.
Suggested Order
- Greybox the player route first Use simple floors, walls, stairs, doors, and sightlines to answer scale and flow questions before detail work.
- Replace or clean up risky pieces Review UVs, materials, colliders, lightmap behavior, and repeated geometry before treating the blockout as final.
- Test the world like a VRChat scene Check spawn readability, Android targets, lighting, occlusion, and upload behavior instead of only judging the Scene view.
Related VRCreators Guides
Common Questions
Can I ship ProBuilder geometry in a VRChat world?
ProBuilder creates Unity meshes. Review their materials, colliders, UVs, lighting, and target-platform behavior before keeping them in a published world.
When should I export a ProBuilder mesh?
Export it when the shape needs work that is easier in dedicated modeling software, then re-import the finished model and verify its materials, scale, and collision.
