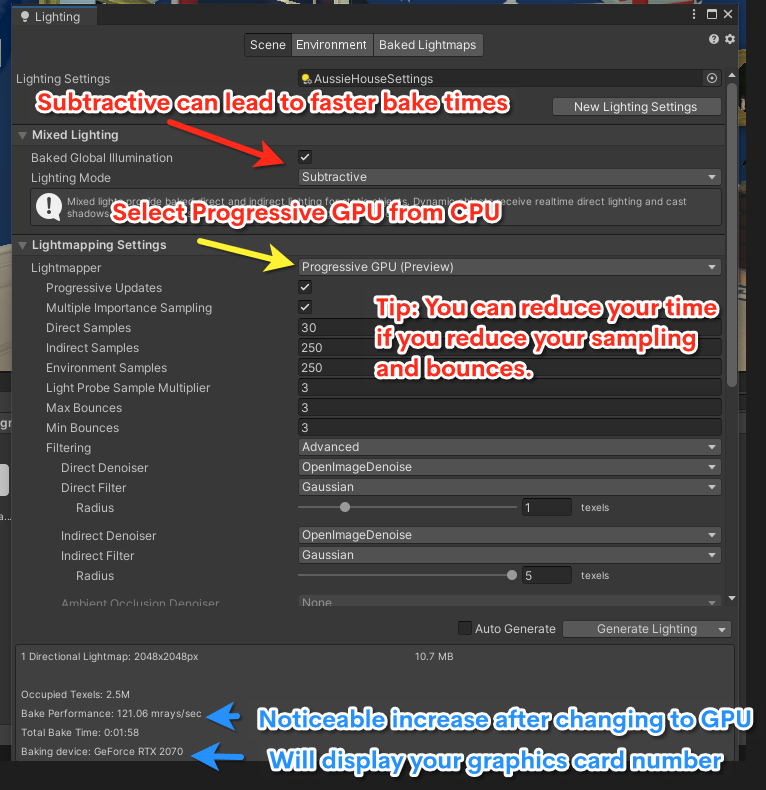
A common frustration is the amount of time you spend baking your lighting in your Unity scene, adding to that frustration is doing that several times over to get your world looking how you want it. Thankfully if you have a dedicated GPU (graphics card) you can toggle to use your graphics card to bake your lighting and reflection probes.
Thankfully, it’s easy to do but often overskipped and at times Unity may not detect your graphics card and select another mode using your CPU which not only would bog down your computer but also take a really long time in comparison to using a GPU.
Switching the lightmapper from CPU to GPU #
- Open your Unity project and go to the “Window” menu.
- From the dropdown menu, select “Rendering” and then “Lighting Settings.”
- In the Lighting window, go to the “Lightmapper” tab.
- Under “Lightmapper Settings,” click on the “CPU” dropdown menu.
- Select “GPU Progressive” from the list.
- Once you select “GPU Progressive,” Unity will automatically switch to the “Progressive GPU” lightmapper.
- If you want to use the “Enlighten” lightmapper instead, select “GPU Enlighten” from the CPU dropdown menu.
- Once you select “GPU Enlighten,” Unity will automatically switch to the “Enlighten GPU” lightmapper.
- After selecting your preferred GPU lightmapper, click on the “Generate Lighting” button in the Lighting window to start baking the lighting with the GPU.
And that’s it! You’ve successfully switched your Unity3D lightmapper from CPU to GPU. This process can vary from Unity3D version and may visually appear slightly different.

Keep in mind when changing your lighting settings you do run the risk of significantly dropping the quality of your world. However, the main advantage of doing so is to find a middle ground where your lighting and textures look fantastic but not cause large files to be generated when the world/kit is built uploaded etc.
GPU Progressive Lightmapper settings #
GPU Progressive Lightmapper
- Direct Samples: The number of samples used for direct lighting calculations. Increasing this value can improve the quality of the lighting but will also increase the baking time.
- Indirect Samples: The number of samples used for indirect lighting calculations. Increasing this value can improve the quality of the lighting but will also increase the baking time.
- Bounces: The number of times indirect light is allowed to bounce around the scene. Increasing this value can improve the quality of the lighting but will also increase the baking time.
- Filtering: Enables or disables filtering of indirect lighting. Enabling this setting can help reduce noise in the final lighting but will also increase the baking time.
- Resolution: The resolution of the lightmap textures. Higher resolutions can result in better quality lighting but will also increase the baking time and memory usage.
- Lightmap Scale: The scaling factor applied to the objects in the scene. Higher values can result in higher quality lighting but will also increase the baking time and memory usage.
GPU Enlighten Lightmapper
- Final Gather: The number of final gather rays used to sample the scene. Increasing this value can improve the quality of the lighting but will also increase the baking time.
- Filter Radius: The radius of the filter applied to the final gather samples. Increasing this value can help reduce noise in the final lighting but will also increase the baking time.
- Resolution: The resolution of the lightmap textures. Higher resolutions can result in better quality lighting but will also increase the baking time and memory usage.
- Lightmap Scale: The scaling factor applied to the objects in the scene. Higher values can result in higher quality lighting but will also increase the baking time and memory usage.
It’s important to note that the actual impact of these settings on the quality and performance of the lighting will depend on the complexity of your scene and the power of your GPU. Experiment with different settings to find the right balance between quality and baking time.


